How to Make Puff Pastry – Step-by-Step Guide to Flaky Layers
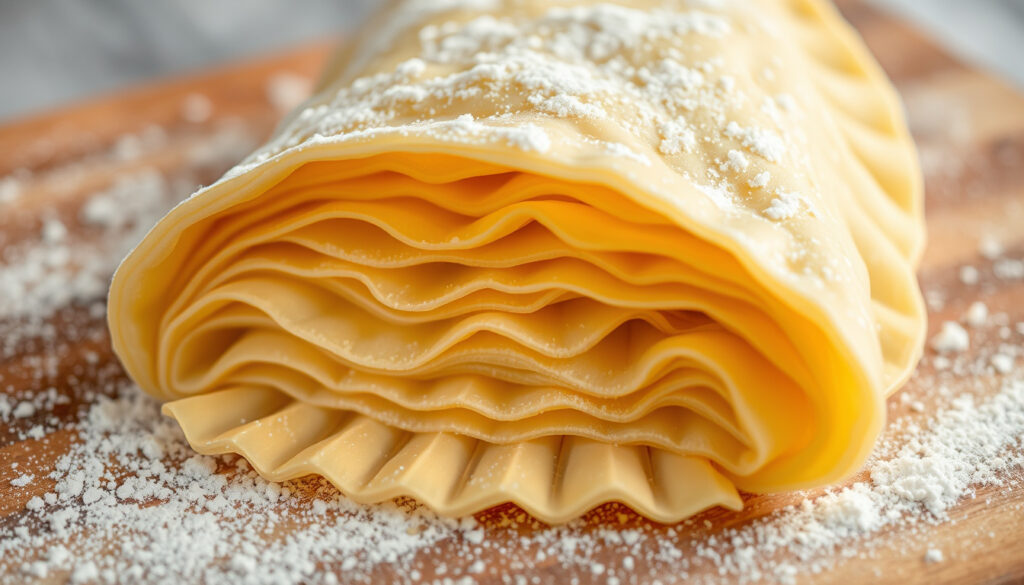
Puff pastry stands as one of classical cuisine’s most impressive culinary achievements—hundreds of paper-thin layers of dough alternating with butter, each one rising dramatically when heat transforms the fat’s moisture into steam. While commercially produced versions fill grocery shelves, creating this laminated dough at home delivers a flavor and flakiness that simply cannot be matched by mass-produced alternatives.
Mastering puff pastry requires patience, precision, and respect for cold temperatures. The technique dates back to nineteenth-century France, where patissiers refined the method of encasing butter within dough and repeatedly folding to create what bakers call thousand layers. Understanding the science behind those layers transforms an intimidating recipe into an achievable goal for dedicated home cooks.
This guide covers everything from ingredient selection through storage instructions, examining both the traditional method requiring six folds and a faster rough puff alternative that produces excellent results in roughly half the time. Whether aiming for classic croissants or quick weeknight turnovers, the principles remain consistent: keep everything cold, handle the dough minimally, and allow adequate resting time between folds.
What Ingredients and Tools Do You Need to Make Puff Pastry Dough?
The ingredient list for puff pastry remains deliberately short—flour, butter, water, and salt create the foundation for hundreds of layers. Quality matters enormously here, as each component performs a specific structural and textural function that cannot be replicated by substitutes.
Time Required
1-2 hours active + chilling
Skill Level
Intermediate
Yield
Approximately 1.5 lbs dough
Key Technique
Lamination through folding
Essential Ingredients for Puff Pastry
All-purpose flour serves as the standard choice across professional and home kitchens. Its protein content of 10-11% provides sufficient gluten structure without creating excessive toughness that would cause shrinking during baking. Bread flour produces too much gluten, while cake flour lacks the necessary strength to contain butter during lamination.
Very cold butter forms the heart of every puff pastry recipe. Professional bakers recommend European-style butter with higher fat content, as this produces superior steam when heated and creates more dramatic layering. The butter must remain cold throughout production—any melting results in greasy, dense pastry rather than flaky layers. Cubed butter measuring ¼-½ inch pieces distributes more evenly than larger chunks.
Ice-cold water hydrates the flour without warming the butter. Salt dissolved in the water strengthens gluten development and seasons the dough. Standard measurements use approximately ½ cup water with ¼ teaspoon salt for salted butter, increasing to ¾ teaspoon when using unsalted butter.
- Use ice-cold butter straight from the refrigerator
- Chill all equipment, including mixing bowls and rolling pins
- Work in a cool kitchen environment when possible
- Keep dough in the refrigerator during all rest periods
- Opt for European-style butter containing 82-84% fat
- Handle dough minimally to prevent warming butter
- Allow adequate resting time between folds
| Ingredient | Amount | Notes |
|---|---|---|
| All-purpose flour | 500g (approximately 4 cups) | 10-11% protein content preferred |
| Very cold butter | 500g (approximately 3.5 sticks) | European-style recommended; cubed ¼-½ inch |
| Ice-cold water | 200ml (approximately ¾ cup) | With dissolved salt |
| Fine salt | 10g (approximately 2 tsp) | Adjust if butter is salted |
How Do You Make Puff Pastry from Scratch: Step-by-Step?
The classic puff pastry method involves creating two separate components—a flour-based dough called détrempe and a butter block known as beurrage—then laminating them together through a series of rolling and folding operations. This labor-intensive technique produces the most consistent layers and superior texture, but requires patience and attention to temperature control.
Creating the Dough Base (Détrempe)
Begin by whisking flour and salt together in a large bowl. Slowly stream in ice-cold salted water while mixing gently, working just until a soft, shaggy dough forms. Overmixing develops gluten, resulting in tough pastry that shrinks during baking rather than rising freely.
Turn the dough onto a lightly floured surface and shape it into a smooth ball. Flatten into a 7×7-inch square, roughly 1-inch thick. Wrap tightly and refrigerate for 20-30 minutes to relax gluten and cool the dough completely.
Preparing the Butter Block
While the détrempe chills, prepare the butter block. Place 80-90% of total butter into a bowl with a small amount of flour and optionally a squeeze of lemon juice. Mash and work the butter until it forms a smooth, malleable paste with the consistency of modeling clay. The addition of flour prevents the butter from sticking to the dough during rolling.
Shape the butter block into a 6×6-inch square approximately 1-inch thick. Refrigerate until firmly chilled but still pliable—the butter should feel cold but not hard and brittle.
The Lamination Process
Remove both components from the refrigerator. Roll the détrempe into a rectangle large enough to enclose the butter block completely. Place the butter in the center and fold the dough edges over it like an envelope, sealing all seams tightly.
Begin the first fold by rolling the package into a thin rectangle approximately ⅛-¼ inch thick. Fold the rectangle in thirds from left to center, then fold the right section over to complete a letter fold. Rotate the dough 90 degrees and repeat the rolling and folding process.
This sequence constitutes one complete fold. The classic method requires six folds total—three sets of two folds each—with a 20-30 minute refrigeration break between each fold. These rests keep the butter cold and prevent it from being pressed out of the layers.
If the butter begins showing any signs of softening or sticking to the rolling pin during work, the entire package requires immediate refrigeration. Allowing butter to melt destroys the lamination entirely, resulting in dense, greasy pastry rather than the flaky layers that define successful puff pastry.
Final Rest and Preparation for Baking
After completing all folds, wrap the dough tightly and refrigerate for at least one hour. Professional patissiers often allow 1-3 days for the dough to rest thoroughly, which improves flavor development and produces more consistent layering. When ready to use, roll to ⅛-inch thickness and cut as needed.
Preheat ovens to 400°F or higher when baking puff pastry. Egg wash applied before baking promotes golden color and adds shine to the finished product. The high heat creates steam within each butter layer, causing the pastry to rise dramatically before the exterior sets.
Rough Puff Pastry vs Classic: Which Method to Use?
Two distinct approaches dominate home puff pastry production: the traditional classic method requiring six full folds, and a shortcut rough puff technique that produces acceptable results in roughly half the time. Understanding the differences helps determine which method suits specific needs and skill levels.
The Classic Method: Full Lamination
The classic method creates approximately 200-500 individual layers depending on specific technique. By encasing a separate butter block in dough and performing letter folds repeatedly, this approach produces paper-thin layers that rise dramatically and shatter cleanly when bitten. The texture remains consistently flaky throughout, with visible separation between layers.
This method demands six complete folds with 20-30 minute rests between each, plus a minimum one-hour final rest before use. Total production time spans 3-4 hours, not including overnight resting that professionals recommend for optimal results.
The Rough Puff Method: Faster Alternative
Rough puff pastry eliminates the separate butter block entirely, instead cutting cold butter directly into flour and incorporating it through folding and rolling. The technique creates approximately 27 layers rather than hundreds, but produces satisfying flakiness for most applications while requiring significantly less time and skill.
Production involves tossing cubed butter into flour and salt, then rubbing gently by hand until the butter breaks into pea-sized pieces. Add cold water to form shaggy dough, flatten into a disk, and refrigerate for 20 minutes before rolling. Perform 4-6 book folds with 20-minute rests between each, then allow a final 30-minute rest before use.
Food Processor Considerations
A food processor accelerates détrempe preparation by pulsing flour, salt, and ½-¾ of the butter into pea-sized pieces. Add remaining butter cubes and pulse 2-3 times before streaming in ice water for 4-5 pulses until the dough forms a ball. Overprocessing warms the butter and damages lamination, so this method works best for rough puff rather than classic puff production.
| Method | Total Folds | Chill Between Folds | Final Rest | Layer Count |
|---|---|---|---|---|
| Classic Puff | 6 | 20-30 minutes | 1-3 days | 200-500 |
| Rough Puff | 4-6 | 20 minutes | 30+ minutes | Approximately 27 |
Common Mistakes to Avoid When Making Puff Pastry
Even experienced bakers encounter challenges with puff pastry. Understanding the most frequent problems and their solutions prevents wasted ingredients and frustration while improving results with each attempt.
Butter Temperature Problems
Warm or softened butter represents the most common failure point. When butter melts into the dough rather than remaining solid during baking, it cannot create steam, resulting in dense, greasy pastry rather than flaky layers. The solution requires consistent refrigeration, working in cool environments, and using ice-cold equipment throughout production.
If butter begins seeping from the dough during rolling, immediate refrigeration for at least 30 minutes becomes necessary before continuing. Attempting to continue with warm butter destroys the lamination permanently and produces inferior results.
Overworking the Dough
Excessive mixing or kneading develops gluten strands that create tension within the dough. This tension causes shrinking during baking and produces a tough, chewy texture rather than the delicate flakes that characterize successful puff pastry. Minimal handling and brief pulsing keep the dough tender.
Uneven Lamination
Inconsistent pressure during rolling produces uneven dough thickness and butter distribution. When butter breaks through the surface during folding, it creates butter leaks that ruin the layered structure. Maintaining even rolling pressure, rotating the dough 90 degrees between folds, and ensuring adequate refrigeration addresses these issues.
Rotating the dough exactly 90 degrees between each fold ensures butter distributes evenly across all sections. Inconsistent rotation causes butter to accumulate on one side, creating lopsided layering and unpredictable rising patterns.
Poor Rising During Baking
Insufficient oven heat fails to create adequate steam within the layers. Baking at 425°F or higher produces the rapid steam generation necessary for proper rise. Excess water in the dough or dough seams that are not properly sealed also inhibit rising by preventing clean layer separation.
The Puff Pastry Folding Process: A Visual Timeline
Understanding the sequential steps clarifies how each operation contributes to final lamination. The following timeline outlines the complete classic method from initial mixing through final resting.
- Mix the détrempe: Combine flour and salt, stream in cold water, knead minimally until soft dough forms. Shape into 7×7-inch square and refrigerate 20-30 minutes.
- Prepare butter block: Mash butter with flour and lemon juice into smooth paste. Shape into 6×6-inch square and refrigerate 20 minutes until firm but pliable.
- Encase the butter: Roll détrempe into rectangle, center butter block, fold dough over like an envelope and seal all edges.
- First fold set: Roll to thin rectangle, fold in thirds, rotate 90°, repeat. Refrigerate 20-30 minutes.
- Second fold set: Roll, fold in thirds, rotate 90°, repeat. Refrigerate 20-30 minutes.
- Third fold set: Roll, fold in thirds, rotate 90°, repeat. Refrigerate 20-30 minutes.
- Final rest: Wrap tightly and refrigerate minimum 1 hour, ideally 1-3 days for best texture development.
Each fold doubles the layer count. After six folds, the dough contains hundreds of distinct butter-dough layer pairs. The resting periods prevent butter warming while allowing gluten to relax, ensuring the dough rolls smoothly without springing back.
Puff Pastry: What Is Established and What Remains Uncertain
Certain aspects of puff pastry technique are thoroughly documented and reliable across sources, while others show variation depending on specific recipes and methods.
Established Information
- Butter must remain cold throughout production
- Six complete folds produce proper lamination
- 20-30 minute rest periods prevent butter warming
- All-purpose flour provides appropriate protein content
- Baking at 400°F+ produces steam for rising
- Homemade tastes superior to store-bought versions
Areas of Variation
- Optimal final rest duration varies by source
- Rough puff produces acceptable but variable layer counts
- Rise consistency depends on individual oven characteristics
- European butter quality varies between brands
- Food processor results depend on specific model and technique
The Science Behind Puff Pastry Layers
The dramatic rising power of puff pastry stems from a straightforward scientific principle: water molecules trapped within butter convert to steam when heated, pressing apart each individual layer. This steam generation creates pressure that lifts hundreds of paper-thin dough layers simultaneously, producing the characteristic tall, flaky structure.
The nineteenth-century French refinement of the technique established the folding and resting protocol that remains standard today. By laminating butter between dough layers and performing repeated folds, bakers create alternating butter-dough-butter-dough stacks that number in the hundreds. When sliced or perforated before baking, these stacks separate cleanly along layer boundaries.
Expert Perspectives on Puff Pastry Technique
Professional baking resources emphasize temperature control as the defining factor between success and failure. According to detailed technique guides from culinary educators, the butter must remain below 60°F throughout production to maintain the solid state necessary for lamination.
The goal of puff pastry is not to create a risen bread, but rather to create a dough with distinct layers of fat and dough that separate and rise when steam is produced during baking.
— Culinary technique documentation
Another principle reinforced across professional sources concerns minimal handling. Overworking develops gluten strands that create elastic recovery in the dough, causing shrinkage during baking rather than the clean rising that defines successful puff pastry.
Storing and Freezing Homemade Puff Pastry
Proper storage extends puff pastry viability significantly, allowing advance preparation for planned baking projects. Wrapping dough tightly in plastic wrap or parchment paper prevents surface drying while protecting against refrigerator odors.
Refrigerated puff pastry maintains quality for 2-3 days, though flavor and rising ability begin declining after the first day. Freezing offers longer-term preservation—properly wrapped dough keeps for approximately three months. Thaw overnight in the refrigerator before using to ensure even temperature throughout the dough.
Portioning dough into individual disks before freezing improves convenience. Double-wrapping prevents freezer burn and allows using only what is needed without thawing the entire batch. Frozen dough can be rolled directly from the freezer with an additional 5 minutes added to baking time.
Avoid refreezing thawed dough, as each freeze-thaw cycle degrades butter quality and compromises the lamination structure. Plan batches according to anticipated needs to minimize waste and maintain optimal texture.
Is Making Puff Pastry at Home Worth the Effort?
The comparison between homemade and commercial puff pastry reveals clear differences in flavor, texture, and ingredient quality. Store-bought versions contain preservatives that extend shelf life but compromise taste, while commercial production prioritizes durability over excellence.
Homemade puff pastry delivers superior butter flavor, cleaner ingredients, and flakier texture that simply cannot be replicated by mass production. The rough puff method offers an excellent middle ground—requiring roughly half the time of classic technique while producing markedly better results than commercial alternatives.
For occasional use, store-bought puff pastry remains a reasonable convenience. For those pursuing exceptional baked goods or exploring advanced techniques like croissants and vol-au-vent, the investment in homemade dough pays dividends in quality that justify the effort required. The Gammon in Air Fryer recipes on our site demonstrate how homemade puff pastry elevates even simple preparations.
Frequently Asked Questions About Puff Pastry
Is homemade puff pastry better than store-bought?
Homemade puff pastry offers superior butter flavor, cleaner ingredients, and flakier texture compared to commercial versions. Store-bought contains preservatives and uses lower-quality fats that compromise taste, though it remains acceptable for quick applications.
Can you freeze puff pastry dough?
Yes, puff pastry dough freezes successfully for up to three months when wrapped tightly. Thaw overnight in the refrigerator before use and avoid refreezing previously thawed dough to preserve quality.
Why must puff pastry butter remain cold?
Cold butter creates steam when heated, which separates the dough layers and causes rising. Melted butter cannot create this steam pressure and instead soaks into the dough, producing dense, greasy results.
How many folds does puff pastry require?
Classic puff pastry requires six complete folds, arranged as three sets of two folds each. Rough puff pastry uses 4-6 folds for a faster alternative with fewer layers but acceptable results for most applications.
How long does puff pastry dough need to chill?
Dough requires 20-30 minutes of refrigeration between each fold to keep butter cold. After completing all folds, a minimum one-hour rest follows, with overnight rest producing superior texture development.
What happens if butter melts during production?
Melting butter destroys the lamination structure, causing dense and greasy pastry instead of flaky layers. If butter softens, immediately refrigerate the dough for 30 minutes before continuing with the folding process.
Can you make puff pastry in a food processor?
A food processor can prepare the détrempe base quickly by pulsing flour, salt, and butter with ice water. However, overprocessing warms the butter, so this method works best for rough puff rather than classic puff pastry production.
What flour works best for puff pastry?
All-purpose flour with 10-11% protein content provides the ideal balance of structure and tenderness. Bread flour develops too much gluten causing shrinkage, while cake flour lacks sufficient strength to contain butter during lamination.
More related posts
 20 cm in Inches: Exact 7.874″ Conversion + Ruler Guide
 Bacon in Air Fryer: Crispy Recipe & Cooking Times
 Mike Shinoda: Biography, Net Worth, Family & Linkin Park Legacy
 24/7 Fitness in Ireland: Membership Costs, Rules & Chains
 Bank of England Rate: Latest 3.75% Hold & 2026 Forecast
 What Date Is It Today – Current Date in All Formats
 Cast of Gladiator 2 – Full Actors and Roles List
 Train Strikes This Week: UK Dates, Status & Checks